Search the Community
Showing results for tags 'generic'.
-

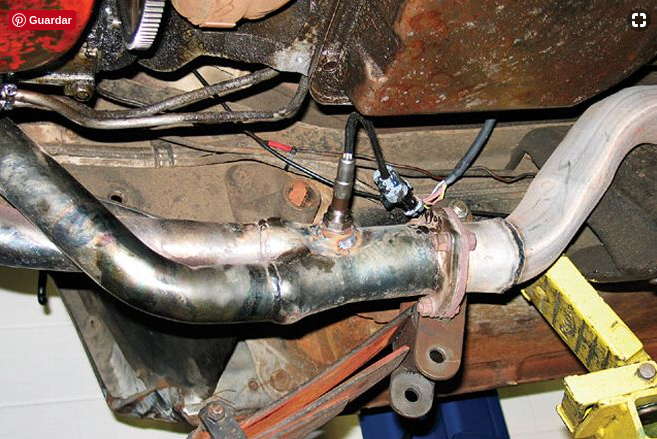 What does this OBD II code mean? This generic OBD2 code is set when the Powertrain Control Module (PCM) senses that the upstream oxygen sensor positive circuit is open. This particular code is pointing out the bank 1, in other words, the bank of cylinders containing cylinder #1. The sensor 1 tag is indicating the upstream O2 sensor located just before the catalytic converter. Why does this OBD II code appear? Most of the oxygen sensors use a 4-wire circuit, but 3-wire circuits and in some cases 5+ wire circuits are also used. What all of them have in common is the “heater circuit”. The heater element helps the sensor to reach its operating temperature faster. The PCM is constantly monitoring the heater circuit, specifically its voltage and/or current. Depending on the year and vehicle maker, the heater circuit can be commanded by the supply voltage (positively controlled) or by the ground circuit (negatively controlled). In both cases, the powertrain control module (PCM) is in charge of activating the circuit when considered necessary. Because of that, the PCM can compare in real time the heater circuit voltage (or current depending on design) with a reference value that it's no other than the vehicle operating voltage. Usually, a discrepancy greater than 10% is enough to alert the PCM about a potential short or open circuit. The OBD2 code P2237 is stored in memory when the PCM detects an open circuit in the positive line used for control. Depending on the year of the vehicle, manufacturer and the sensor design the positive line may have a relay and a fuse. Those elements may also trigger this code. What symptoms may occur with this OBD II code? Expect the typical symptoms from a P2237 code: CEL lit. The Check Engine Light will turn on after few driving cycles to alert the driver about the situation. Poor fuel economy Possible misfires, spark knocking or detonations. Possible rough idle and/or engine hesitation. Sometimes you may expect a lack of power, especially during hard acceleration. In general, expect any condition directly related to an incorrect air-fuel mixture. What are the causes that trigger this OBD II code? There're many factors that could cause a code P2237 including among others the following: Damaged, burnt, corroded, open or shorted upstream O2 sensor wiring. Worn, corroded, burnt, disconnected or bent upstream O2 wiring harness connector pins. Damaged or deficient heater circuit relay or fuse (usually only positively controlled systems) Faulty or deficient upstream oxygen sensor. Even when unlikely, a defective PCM cannot be discarded. Diagnostic strategy for troubleshooting this OBD II code Warning: If any other code directly related with the upstream oxygen sensor is present then you must start diagnosing and solving those codes first. It's highly recommended starting the diagnostic process with the usual information gathering: With the help of a professional OBD2 scan tool, preferably one with OEM capabilities, take note of all data trouble codes in memory, including pending codes. Take note of freeze frame information (if present). Query the vehicle owner about what, when and where the failure occurs. Does it happen with the engine hot? Cold? Under load? All the standard questions. Take note of the vehicle VIN and find a reliable source of technical reference. Once you are done, the next step is discarding an intermittent condition. Using your scan tool clear DTC memory. Perform a complete driving cycle according to OEM procedures. If the code P2237 disappears then inform the owner about the intermittent nature of the code and explain that further testing with the code present will be required. If the code does appear then continue to the testing stage, consisting in discarding the possible causes of the problem. IMPORTANT: the diagnostic procedure explained in this section should be taken as a guideline. Always refer to specific OEM procedures when possible. The workflow for the diagnostic process is: The tests should be executed in sequential order, in other words, complete step 1 before going to step 2 and so on. Repair, fix, or replace any component if you suspect is not in good condition. If any repair, fix, reprogramming or component replacement is made during any step then you should clear DTC memory and repeat the whole KOER driving cycle. If the DTC appear again then you should continue to the next step. If the DTC does not appear again after completing the KOER tests then you can assume the problem is fixed, in that case, continuing with the remaining steps would be optional. The diagnostic process for the code P2237 is as follows: Sensor harness wiring and connector: carry out an exhaustive visual inspection of bank 1 upstream oxygen sensor wiring and connectors. Pay special attention to burnt, corroded, open, shorted to ground or deteriorated wiring and/or connector. Unplug the sensor and check for corrosion, damage, bent pins, etc. Electrical tests: with the help of a digital volt-ohm meter (DVOM) and the adequate wiring diagram perform a KOEO and KOER check on the heater circuit for the bank 1 upstream O2 sensor. Verify supply and/or reference voltage, electrical resistance, continuity, current and ground integrity. Compare the obtained values with the appropriate OEM literature. It’s crucial during this stage to perform the adequate tests depending on circuitry design (positively controlled or negatively controlled). Heater Circuit Relay and Fuse: on some vehicles, you may find a relay that is controlled by the PCM to operate the heater element circuit. If that’s the case, check the condition of the relay and its fuse. Replace as necessary. Upstream oxygen sensor: some manufacturers include built-in tests that help in the process of diagnosing the O2 sensor, others not. Refer to the proper literature in order to perform a complete sensor diagnostic. Replace if needed. As usual, after any repair clear the DTC memory, repeat KOER driving cycle and check if the code persists. If the code appears again then continue with the next step. Problems with the powertrain control module: the most unlikely cause for this code is a faulty PCM or a corrupted program. Yet, if you are completely certain that all prior tests passed then you must remove the PCM and check it, reprogram it or replace it as necessary. Do you need further help....? Discuss your car trouble code further with thousand's of car experts here Check your car problem in Vehicle Recall Section of your car brand
 -
P2271 O2 Sensor Signal Biased/Stuck Rich Bank 1 Sensor 2
DamasoSanoja posted a OBD2 code in Fuel and Air Metering Codes
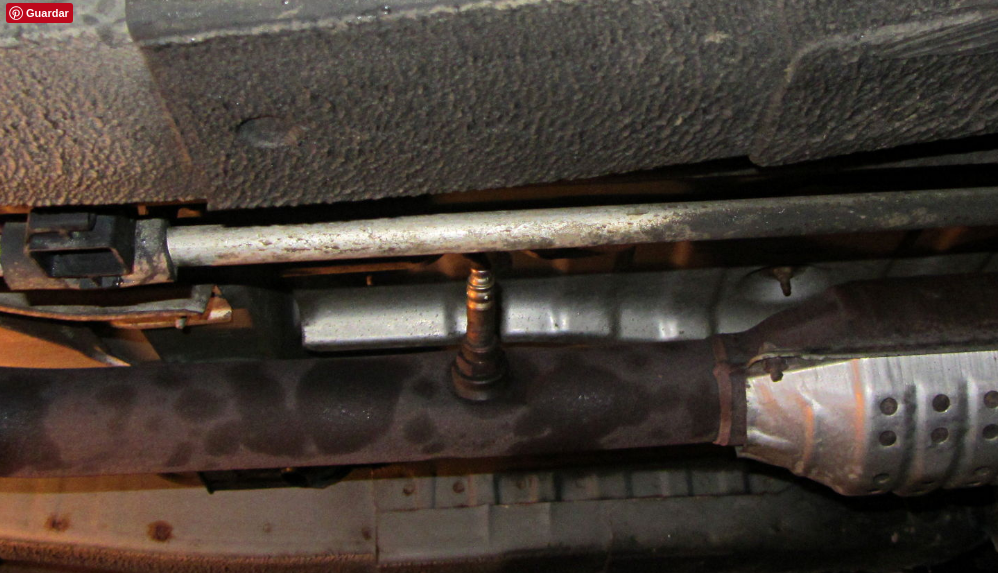 What does this OBD II code mean? This generic OBD2 code is set when the Powertrain Control Module (PCM) constantly senses a rich mixture with little or no change over time. This particular code is pointing out the bank 1, in other words, the bank of cylinders containing cylinder #1. The sensor 2 tag is indicating the downstream O2 sensor located just after the catalytic converter. Why does this OBD II code appear? Post catalyst oxygen sensors normally cycle between rich and lean mixtures at a slow rate. Their waveform is somewhat flat but the value is never constant. When the PCM detects a bias toward a rich state or worse yet, a fixed value close to 0.9V, it initiates the compensation protocol and turns on the CEL. The OBD2 code P2271 is stored in memory when the PCM detects a condition like the explained above where the bank 1, sensor 2 is constantly reporting a rich mixture during a given period of time, even after fuel delivery compensation. What symptoms may occur with this OBD II code? Assuming a rich mixture is indeed present, expect the typical symptoms from such condition: CEL lit. The Check Engine Light will turn on after few driving cycles to alert the driver about the situation. Poor fuel economy. Possible misfires and/or spark knock. You may have rough idling. Possible hesitation during acceleration. A strong gasoline smell on the exhaust and/or a “rotten eggs” smell. Depending on the vehicle year a slight rise in engine temperature may occur. Under extreme circumstances, a black smoke may be noticeable coming out the exhaust pipe. What are the causes that trigger this OBD II code? There're many factors that could cause a rich mixture condition including among others the following: Damaged, burnt, corroded, open or shorted O2 sensor wiring. Worn, corroded, burnt, disconnected or bent O2 wiring harness connector pins. High fuel system pressure caused by the fuel pump or faulty/deficient fuel pressure regulator Excess fuel caused by stuck fuel injectors or even dirty fuel injectors not pulverizing fuel as expected (deficient fuel spray). Faulty or deficient upstream oxygen sensor. Faulty or deficient downstream oxygen sensor. Even when unlikely, a defective PCM cannot be discarded. Please notice that possible causes are based on the assumption that only trouble code P2271 is stored in memory. Diagnostic strategy for troubleshooting this OBD II code Warning: If any other code directly related to the bank 1 oxygen sensor 1 is present then you must start diagnosing and solving those codes first. The same recommendation applies to MAF sensor trouble codes. It's highly recommended starting the diagnostic process with the usual information gathering: With the help of a professional OBD2 scan tool, preferably one with OEM capabilities, take note of all data trouble codes in memory, including pending codes. Take note of freeze frame information (if present). Query the vehicle owner about what, when and where the failure occurs. Does it happen with the engine hot? Cold? Under load? All the standard questions. Take note of the vehicle VIN and find a reliable source of technical reference. Once you are done, the next step is discarding an intermittent condition. Using your scan tool clear DTC memory. Perform a complete driving cycle according to OEM procedures. If the code P2271 disappears then inform the owner about the intermittent nature of the code and explain that further testing with the code present will be required. If the code does appear then continue to the testing stage, consisting in discarding the possible causes of the problem. IMPORTANT: the diagnostic procedure explained in this section should be taken as a guideline. Always refer to specific OEM procedures when possible. The workflow for the diagnostic process is: The tests should be executed in sequential order, in other words, complete step 1 before going to step 2 and so on. Repair, fix, or replace any component if you suspect is not in good condition. If any repair, fix, reprogramming or component replacement is made during any step then you should clear DTC memory and repeat the whole KOER driving cycle. If the DTC appear again then you should continue to the next step. If the DTC does not appear again after completing the KOER tests then you can assume the problem is fixed, in that case, continuing with the remaining steps would be optional. The diagnostic process for the code P2271 is as follows: Sensor harness wiring and connector: carry out an exhaustive visual inspection of MAF sensor and oxygen sensor wiring and connectors. Pay special attention to burnt, corroded or deteriorated wiring and/or connector. Unplug each sensor and check for corrosion, damage, bent pins, etc. Electrical tests: with the help of a digital volt-ohm meter (DVOM) and the adequate wiring diagram perform a KOEO check on the MAF and O2 sensors. Verify supply and/or reference voltage, electrical resistance, continuity, current and ground integrity. Compare the obtained values with the appropriate OEM literature. Fuel system delivery: carry out a manual fuel pressure reading using a proper fuel pressure gauge and adapters. This is crucial, even if the scanner is reporting the fuel pressure. If the fuel pressure is above its normal value then perform an extensive fuel system test starting with the fuel pump followed by the fuel pressure regulator and fuel injectors performance. Upstream oxygen sensor: some manufacturers include built-in tests that help in the process of diagnosing the O2 sensor, others not. Refer to the proper literature in order to perform a complete sensor diagnostic. Replace if needed. As usual, after any repair clear the DTC memory, repeat KOER driving cycle and check if the code persists. If the code appears again then continue with the next step. Downstream oxygen sensor: most vehicle manufacturers use traditional oxygen sensors (instead of A/F sensors) for the post-catalyst monitoring. This opens you the possibility of performing the sensor test using a DVOM, an oscilloscope or a scan tool. Refer to the proper OEM literature in order to decide what is the best approach. Replace the O2 sensor if necessary and repeat all KOER tests before continuing. Problems with the powertrain control module: the most unlikely cause for this code is a faulty PCM or a corrupted program. Yet, if you are completely certain that all prior tests passed then you must remove the PCM and check it, reprogram it or replace it as necessary. Do you need further help....? Discuss your car trouble code further with thousand's of car experts here Check your car problem in Vehicle Recall Section of your car brand
 -
P200B Intake Manifold Runner Performance Bank 2
DamasoSanoja posted a OBD2 code in Fuel and Air Metering Codes
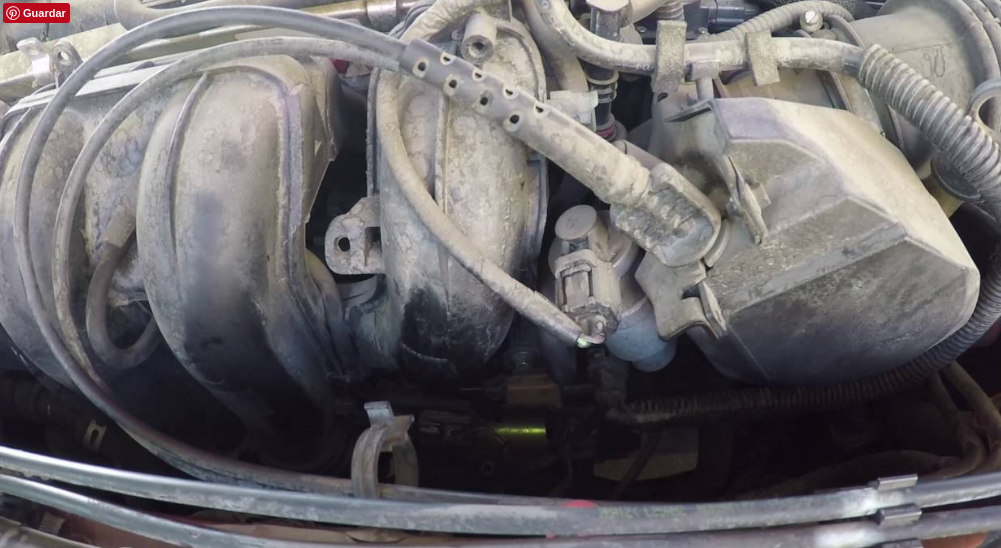 What does this OBD II code mean? This generic OBD2 code is set when the Powertrain Control Module (PCM) detects that the Intake Manifold Runner Control (IMRC) performance is outside the acceptable parameters. This particular code is pointing out the bank 2, in other words, the bank of cylinders not containing cylinder #1. Why does this OBD II code appear? The Intake Manifold Runner Control (IMRC) is a system in charge of controlling the intake manifold variable airflow. Depending on the OEM, this system can vary the length of intake ports (from short to long) or simply regulate the airflow turbulence using a flap design similar to the throttle body. The goal of IMRC is prioritizing torque or power at any given operational condition. At lower RPM the IMRC helps the engine to achieve more torque, as you may infer, at higher RPM the IMRC operates in order to increase the engine power. Using this technology the manufacturers can also boost fuel economy and decrease the exhaust emissions. Some IMRC systems discriminate engine banks because they operate each one independently of the other. In order to achieve peak performance, the PCM uses information from many of its sensors. including but not limited to engine speed sensor, throttle position sensor, the throttle pedal position sensor (if applicable), and in some cases, the engine coolant. The sensors’ data allows the PCM modulating the IMRC actuators under different conditions as well as determining its performance. The OBD2 code P200B is set when the PCM senses that the intake manifold runner control is not performing as expected. What symptoms may occur with this OBD II code? The following symptoms could be present: CEL lit. The Check Engine Light will turn on after few driving cycles to alert the driver about the situation. Expect reduced engine power/torque depending on IMRC position (in case it got stuck). Also, expect a variation in fuel economy depending on IMRC condition. Engine lags under wide open throttle situations are very common. Some engine technologies may be susceptible to IMRC failures and cause rough idle, gasoline smell in the exhaust tail and even some emission related codes. What are the causes that trigger this OBD II code? There're many factors that could trigger this code including among others the following: Damaged, burnt, corroded, open or shorted IMRC wiring. Worn, corroded, burnt, disconnected or bent IMRC wiring harness connector pins. Air leaks in the intake manifold, PCV hose, vacuum hoses, vacuum driven components or MAF sensor tubing. Faulty, worn, corroded, broken or bent IMRC linkage. The majority of IMRC systems use metal flaps (similar to throttle body flap) that are linked together to control the whole bank. It’s common to find wear or corrosion in the mechanical components, especially in hot or high humidity climates. Damaged, worn, corroded or broken IMRC bushing. The normal mechanical wear produced by the constant usage of this system could cause the mechanism to “get stuck” or “partially stuck”. Think of it as the “mechanical resistance to movement” that will make very difficult to comply with PCM orders Faulty or deficient IMRC actuator (electrical or vacuum operated). The IMRC actuator is usually electro-mechanical (a servo motor electronically controlled by the PCM similar to ETC) or vacuum controlled. Either design, it’s susceptible to failure as any other moving part in the engine. Even when unlikely, a defective PCM cannot be discarded. Diagnostic strategy for troubleshooting this OBD II code It's highly recommended starting the diagnostic process with the usual information gathering: With the help of a professional OBD2 scan tool, preferably one with OEM capabilities, take note of all data trouble codes in memory, including pending codes. Take note of freeze frame information (if present). Query the vehicle owner about what, when and where the failure occurs. Does it happen with the engine hot? Cold? Under load? All the standard questions. Take note of the vehicle VIN and find a reliable source of technical reference. Once you are done, the next step is discarding an intermittent condition. Using your scan tool clear DTC memory. Perform a complete driving cycle according to OEM procedures. If the code P200B disappears then inform the owner about the intermittent nature of the code and explain that further testing with the code present will be required. If the code does appear then continue to the testing stage, consisting in discarding the possible causes of the problem. IMPORTANT: the diagnostic procedure explained in this section should be taken as a guideline. Always refer to specific OEM procedures when possible. The workflow for the diagnostic process is: The tests should be executed in sequential order, in other words, complete step 1 before going to step 2 and so on. Repair, fix, or replace any component if you suspect is not in good condition. If any repair, fix, reprogramming or component replacement is made during any step then you should clear DTC memory and repeat the whole KOER driving cycle. If the DTC appear again then you should continue to the next step. If the DTC does not appear again after completing the KOER tests then you can assume the problem is fixed, in that case, continuing with the remaining steps would be optional. The diagnostic process for the code P200B is as follows: IMRC harness wiring and connector: carry out an exhaustive visual inspection of IMRC wiring and connectors. Pay special attention to burnt, corroded or deteriorated wiring and/or connector. Unplug the actuator and check for corrosion, damage, bent pins, etc. Electrical tests: with the help of a digital volt-ohm meter (DVOM) and the adequate wiring diagram perform a KOEO check of the IMRC. Verify supply and/or reference voltage, electrical resistance, continuity, current and ground integrity. Compare the obtained values with the appropriate OEM literature. Vacuum and/or air leaks: perform a manual vacuum reading in the intake manifold test port or in any direct vacuum hose with no direct relation to the fuel injection system. If the vacuum reading is not within the normal value then perform a comprehensive visual inspection of all vacuum hoses including but not limited to PCV hose, fuel pressure regulator hose, MAP hose, brakes hose, etc, also look for intake manifold leaks and pay special attention to possible air or vacuum leaks downstream the MAF sensor. Also, check PCV and replace if defective. IMRC functional test: with the help of a professional OBD2 scan tool carry out an actuator test (sometimes called functional test). This test allows you to operate the IMRC system, depending on the vehicle year and manufacturer the test requires an engine running (KOER) condition or key on engine off (KOEO) condition. During the test pay special attention to any suspicious sound as a possible indication of internal wear. IMRC functional test (vacuum controlled): if the system is vacuum operated then check all associated vacuum lines and check valves. Using a manual vacuum pump check the actuator operation. Problems with the powertrain control module: the most unlikely cause for this code is a faulty PCM or a corrupted program. Yet, if you are completely certain that all prior tests passed then you must remove the PCM and check it, reprogram it or replace it as necessary. Do you need further help....? Discuss your car trouble code further with thousand's of car experts here Check your car problem in Vehicle Recall Section of your car brand
 -
P2273 O2 Sensor Signal Biased/Stuck Rich Bank 2 Sensor 2
DamasoSanoja posted a OBD2 code in Fuel and Air Metering Codes
 What does this OBD II code mean? This generic OBD2 code is set when the Powertrain Control Module (PCM) constantly senses a rich mixture with little or no change over time. This particular code is pointing out the bank 2, in other words, the bank of cylinders not containing cylinder #1. The sensor 2 tag is indicating the downstream O2 sensor located just after the catalytic converter. Why does this OBD II code appear? Post catalyst oxygen sensors normally cycle between rich and lean mixtures at a slow rate. Their waveform is somewhat flat but the value is never constant. When the PCM detects a bias toward a rich state or worse yet, a fixed value close to 0.9V, it initiates the compensation protocol and turns on the CEL. The OBD2 code P2273 is stored in memory when the PCM detects a condition like the explained above where the bank 2, sensor 2 is constantly reporting a rich mixture during a given period of time, even after fuel delivery compensation. What symptoms may occur with this OBD II code? Assuming a rich mixture is indeed present, expect the typical symptoms from such condition: CEL lit. The Check Engine Light will turn on after few driving cycles to alert the driver about the situation. Poor fuel economy. Possible misfires and/or spark knock. You may have rough idling. Possible hesitation during acceleration. A strong gasoline smell on the exhaust and/or a “rotten eggs” smell. Depending on the vehicle year a slight rise in engine temperature may occur. Under extreme circumstances, a black smoke may be noticeable coming out the exhaust pipe. What are the causes that trigger this OBD II code? There're many factors that could cause a rich mixture condition including among others the following: Damaged, burnt, corroded, open or shorted O2 sensor wiring. Worn, corroded, burnt, disconnected or bent O2 wiring harness connector pins. High fuel system pressure caused by the fuel pump or faulty/deficient fuel pressure regulator Excess fuel caused by stuck fuel injectors or even dirty fuel injectors not pulverizing fuel as expected (deficient fuel spray). Faulty, deficient or dirty mass air flow sensor (MAF) Faulty or deficient upstream oxygen sensor. Faulty or deficient downstream oxygen sensor. Even when unlikely, a defective PCM cannot be discarded. Please notice that possible causes are based on the assumption that only trouble code P2273 is stored in memory. Diagnostic strategy for troubleshooting this OBD II code Warning: If any other code directly related to the bank 2 oxygen sensor 1 is present then you must start diagnosing and solving those codes first. The same recommendation applies to MAF sensor trouble codes. It's highly recommended starting the diagnostic process with the usual information gathering: With the help of a professional OBD2 scan tool, preferably one with OEM capabilities, take note of all data trouble codes in memory, including pending codes. Take note of freeze frame information (if present). Query the vehicle owner about what, when and where the failure occurs. Does it happen with the engine hot? Cold? Under load? All the standard questions. Take note of the vehicle VIN and find a reliable source of technical reference. Once you are done, the next step is discarding an intermittent condition. Using your scan tool clear DTC memory. Perform a complete driving cycle according to OEM procedures. If the code P2273 disappears then inform the owner about the intermittent nature of the code and explain that further testing with the code present will be required. If the code does appear then continue to the testing stage, consisting in discarding the possible causes of the problem. IMPORTANT: the diagnostic procedure explained in this section should be taken as a guideline. Always refer to specific OEM procedures when possible. The workflow for the diagnostic process is: The tests should be executed in sequential order, in other words, complete step 1 before going to step 2 and so on. Repair, fix, or replace any component if you suspect is not in good condition. If any repair, fix, reprogramming or component replacement is made during any step then you should clear DTC memory and repeat the whole KOER driving cycle. If the DTC appear again then you should continue to the next step. If the DTC does not appear again after completing the KOER tests then you can assume the problem is fixed, in that case, continuing with the remaining steps would be optional. The diagnostic process for the code P2273 is as follows: Sensor harness wiring and connector: carry out an exhaustive visual inspection of MAF sensor and oxygen sensor wiring and connectors. Pay special attention to burnt, corroded or deteriorated wiring and/or connector. Unplug each sensor and check for corrosion, damage, bent pins, etc. Electrical tests: with the help of a digital volt-ohm meter (DVOM) and the adequate wiring diagram perform a KOEO check on the MAF and O2 sensors. Verify supply and/or reference voltage, electrical resistance, continuity, current and ground integrity. Compare the obtained values with the appropriate OEM literature. Fuel system delivery: carry out a manual fuel pressure reading using a proper fuel pressure gauge and adapters. This is crucial, even if the scanner is reporting the fuel pressure. If the fuel pressure is above its normal value then perform an extensive fuel system test starting with the fuel pump followed by the fuel pressure regulator and fuel injectors performance. Downstream oxygen sensor: most vehicle manufacturers use traditional oxygen sensors (instead of A/F sensors) for the post-catalyst monitoring. This opens you the possibility of performing the sensor test using a DVOM, an oscilloscope or a scan tool. Refer to the proper OEM literature in order to decide what is the best approach. Replace the O2 sensor if necessary and repeat all KOER tests before continuing. Problems with the powertrain control module: the most unlikely cause for this code is a faulty PCM or a corrupted program. Yet, if you are completely certain that all prior tests passed then you must remove the PCM and check it, reprogram it or replace it as necessary. Do you need further help....? Discuss your car trouble code further with thousand's of car experts here Check your car problem in Vehicle Recall Section of your car bran
 -
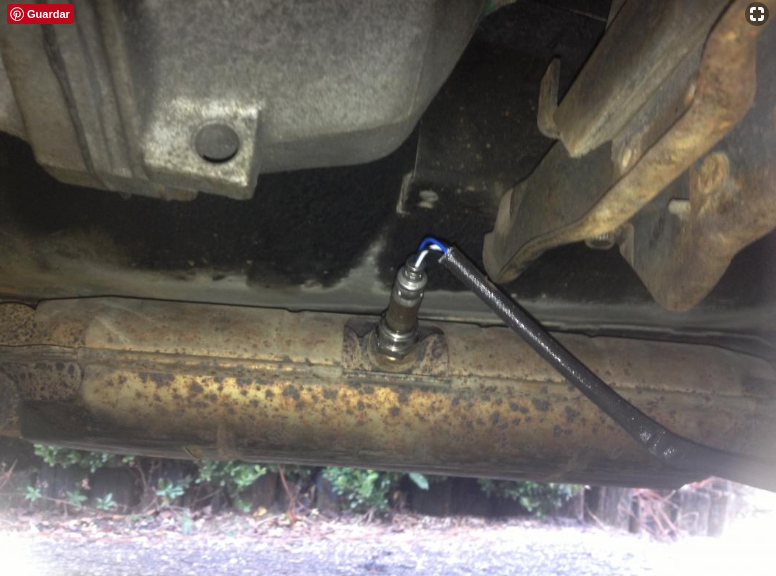 What does this OBD II code mean? This generic OBD2 code is set when the Powertrain Control Module (PCM) senses a short circuit between the O2 sensor signal and the heater element circuit. This particular code is pointing out the bank 1, in other words, the bank of cylinders containing cylinder #1. The sensor 2 tag is indicating the downstream O2 sensor located just after the catalytic converter Why does this OBD II code appear? Most of these oxygen sensors use a 4-wire circuit, but 3-wire circuits and in some cases 5+ wire circuits are also used. What all of them have in common is the “heater circuit”. The heater element helps the sensor to reach its operating temperature faster. The PCM is constantly monitoring the heater circuit, specifically its voltage and/or current. Depending on the year and vehicle maker, the heater circuit can be commanded by the supply voltage (positively controlled) or by the ground circuit (negatively controlled). In both cases, the powertrain control module (PCM) is in charge of activating the circuit when considered necessary. Because of that, the PCM can compare in real time the heater circuit voltage (or current depending on design) with a reference value that its no other than the vehicle operating voltage. Usually, a discrepancy greater than 10% is enough to alert the PCM about a potential short. The OBD2 code P2232 is stored in memory when the PCM detects a short in the sensor signal with the heater element circuit for bank 1, sensor 2. What symptoms may occur with this OBD II code? Expect the typical symptoms from a P2232 code: CEL lit. The Check Engine Light will turn on after few driving cycles to alert the driver about the situation. What are the causes that trigger this OBD II code? There're many factors that could cause a code P2232 including among others the following: Damaged, burnt, corroded, open or shorted downstream O2 sensor wiring. Worn, corroded, burnt, disconnected or bent downstream O2 wiring harness connector pins. Damaged or deficient heater circuit relay or fuse (usually only positively controlled systems) Faulty or deficient downstream oxygen sensor. Even when unlikely, a defective PCM cannot be discarded. Diagnostic strategy for troubleshooting this OBD II code Warning: If any other code directly related with the upstream oxygen sensor is present then you must start diagnosing and solving those codes first. It's highly recommended starting the diagnostic process with the usual information gathering: With the help of a professional OBD2 scan tool, preferably one with OEM capabilities, take note of all data trouble codes in memory, including pending codes. Take note of freeze frame information (if present). Query the vehicle owner about what, when and where the failure occurs. Does it happen with the engine hot? Cold? Under load? All the standard questions. Take note of the vehicle VIN and find a reliable source of technical reference. Once you are done, the next step is discarding an intermittent condition. Using your scan tool clear DTC memory. Perform a complete driving cycle according to OEM procedures. If the code P2232 disappears then inform the owner about the intermittent nature of the code and explain that further testing with the code present will be required. If the code does appear then continue to the testing stage, consisting in discarding the possible causes of the problem. IMPORTANT: the diagnostic procedure explained in this section should be taken as a guideline. Always refer to specific OEM procedures when possible. The workflow for the diagnostic process is: The tests should be executed in sequential order, in other words, complete step 1 before going to step 2 and so on. Repair, fix, or replace any component if you suspect is not in good condition. If any repair, fix, reprogramming or component replacement is made during any step then you should clear DTC memory and repeat the whole KOER driving cycle. If the DTC appear again then you should continue to the next step. If the DTC does not appear again after completing the KOER tests then you can assume the problem is fixed, in that case, continuing with the remaining steps would be optional. The diagnostic process for the code P2232 is as follows: Sensor harness wiring and connector: carry out an exhaustive visual inspection of bank 1 downstream oxygen sensor wiring and connectors. Pay special attention to burnt, corroded, open, shorted to ground or deteriorated wiring and/or connector. Unplug the sensor and check for corrosion, damage, bent pins, etc. Heater circuit relay/fuse: on systems with a positively controlled heater circuit is not uncommon to find a relay and/or fuse as part of the circuit. Check its condition and replace as necessary. Electrical tests: with the help of a digital volt-ohm meter (DVOM) and the adequate wiring diagram perform a KOEO and KOER check on the heater circuit for the bank 1 downstream O2 sensor. Verify supply and/or reference voltage, electrical resistance, continuity, current and ground integrity. Compare the obtained values with the appropriate OEM literature. It’s crucial during this stage to perform the adequate tests depending on circuitry design (positively controlled or negatively controlled). Downstream oxygen sensor: some manufacturers include built-in tests that help in the process of diagnosing the O2 sensor, others not. Refer to the proper literature in order to perform a complete sensor diagnostic. Replace if needed. As usual, after any repair clear the DTC memory, repeat KOER driving cycle and check if the code persists. If the code appears again then continue with the next step. Problems with the powertrain control module: the most unlikely cause for this code is a faulty PCM or a corrupted program. Yet, if you are completely certain that all prior tests passed then you must remove the PCM and check it, reprogram it or replace it as necessary. Do you need further help....? Discuss your car trouble code further with thousand's of car experts here Check your car problem in Vehicle Recall Section of your car brand
 -
P0335 Crankshaft Position Sensor A - UAE
DamasoSanoja posted a OBD2 code in Ignition System or Misfire Codes
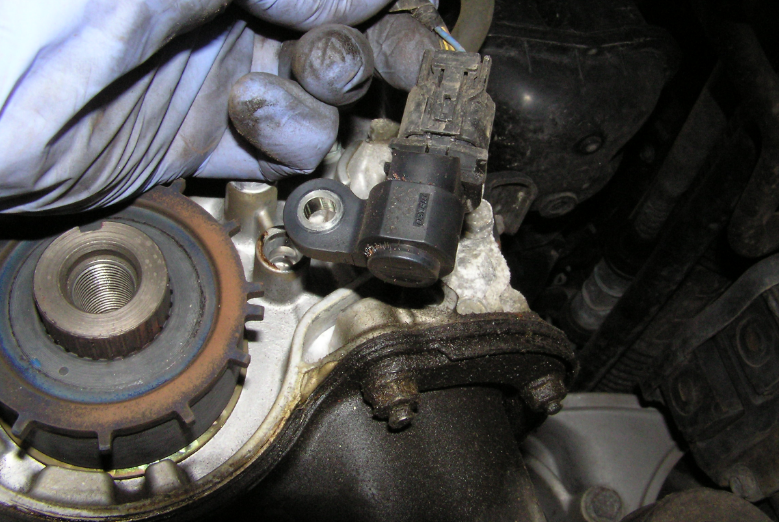 What does this OBD II code mean? This generic OBD2 code is set when the Powertrain Control Module (PCM) senses that the crankshaft position sensor (CKP) signal is not present or its pulse is abnormal. This particular code is pointing out the bank 1, in other words, the bank of cylinders containing cylinder #1. Why does this OBD II code appear? In the vast majority of vehicles, the CKP sensor is used to control the spark timing and also measuring the engine RPM output. Generally speaking, most CKP sensors are based in the hall effect principle consisting in a trigger wheel (most of the times attached to the crankshaft) and a magnetic hall effect sensor that is fixed at a certain distance from the wheel. The normal crankshaft rotation causes the toothed wheel to align with the magnetic sensor and trigger a signal. These signals create a square-shaped sinusoidal waveform that the PCM interprets as the engine RPM. The tooth corresponding to cylinder number one is usually different that way the PCM has a proper reference that in conjunction with the engine firing order allows it to control the spark timing with a high degree of precision. The magnetic sensor can get clogged with metal debris normally present in the engine oil. That could cause changes in the waveform or in extreme cases a complete signal loss. Due to its vital function, any variation in the normal signal is interpreted by the PCM as a severe problem that triggers its compensation routines. The OBD2 code P0335 is stored in memory when the PCM detects an abnormal variation in the CKP signal or when its signal is completely lost. What symptoms may occur with this OBD II code? Expect the typical symptoms from a loss of spark timing signal: CEL lit. The Check Engine Light will turn on after few driving cycles to alert the driver about the situation. Depending on the vehicle manufacturer, installed sensors and compensation routine the vehicle may not start. Poor fuel economy. Possible misfires and/or spark knock. You may have rough idling. It’s not uncommon that the engine dies while driving Hesitation during acceleration, especially under wide open throttle (WOT) conditions. What are the causes that trigger this OBD II code? There're many factors that could cause a P0335 code including among others the following: Damaged, burnt, corroded, open or shorted CKP sensor wiring. Worn, corroded, burnt, disconnected or bent CKP wiring harness connector pins. Broken or off timing chain/belt. Faulty, deficient, damaged or broken trigger wheel Faulty, deficient or dirty crankshaft position sensor (CKP) Even when unlikely, a defective PCM cannot be discarded. Some Nissan models are also very sensitive to the following conditions: The battery voltage is low. This condition produces a lower than expected RPM during starting, which is misinterpreted by the PCM as a CKP issue. The starter is weak. This is a similar situation than before. When the PCM senses “low” RPM during engine start its programming triggers a P0335 code. Even though these conditions are especially delicate for certain Nissan models, do not discard (regardless of the model or brand of the vehicle) checking the battery voltage. Charge as necessary. The same principle applies to the starter motor, it’s always a good idea to perform a quick test and verify is functioning properly. Finally, the 2004-2009 Nisan Titan and Nissan Armada have a Technical Service Bulletin (TSB) that points out a very curious situation. In those models, the crankshaft position sensor and camshaft position sensor are identical. Code P0335 can be set when the inappropriate sensor is installed. Refer to the TSB for proper identification. Diagnostic strategy for troubleshooting this OBD II code It's highly recommended starting the diagnostic process with the usual information gathering: With the help of a professional OBD2 scan tool, preferably one with OEM capabilities, take note of all data trouble codes in memory, including pending codes. Take note of freeze frame information (if present). Query the vehicle owner about what, when and where the failure occurs. Does it happen with the engine hot? Cold? Under load? All the standard questions. Take note of the vehicle VIN and find a reliable source of technical reference. Once you are done, the next step is discarding an intermittent condition. Using your scan tool clear DTC memory. Perform a complete driving cycle according to OEM procedures. If the code P0335 disappears then inform the owner about the intermittent nature of the code and explain that further testing with the code present will be required. If the code does appear then continue to the testing stage, consisting in discarding the possible causes of the problem. IMPORTANT: the diagnostic procedure explained in this section should be taken as a guideline. Always refer to specific OEM procedures when possible. The workflow for the diagnostic process is: The tests should be executed in sequential order, in other words, complete step 1 before going to step 2 and so on. Repair, fix, or replace any component if you suspect is not in good condition. If any repair, fix, reprogramming or component replacement is made during any step then you should clear DTC memory and repeat the whole KOER driving cycle. If the DTC appear again then you should continue to the next step. If the DTC does not appear again after completing the KOER tests then you can assume the problem is fixed, in that case, continuing with the remaining steps would be optional. The diagnostic process for the code P0335 is as follows: Sensor harness wiring and connector: carry out an exhaustive visual inspection of CKP sensor wiring and connectors. Pay special attention to burnt, corroded, open, shorted to ground or deteriorated wiring and/or connector. Unplug the sensor and check for corrosion, damage, bent pins, etc. Electrical tests: with the help of a digital volt-ohm meter (DVOM) and the adequate wiring diagram perform a KOEO check on the CKP sensor. Verify supply and/or reference voltage, electrical resistance, continuity, current and ground integrity. Compare the obtained values with the appropriate OEM literature. Battery/Starter test: as explained in a previous section, it’s a good idea to check battery supply voltage as well as starter motor condition. Repair or replace as necessary. Crankshaft position sensor visual inspection: remove the sensor from the engine and look for metal debris attached to it and/or a broken sensor tip. Clean the sensor if necessary and repeat KOER tests. Reluctor wheel/ring visual inspection: similarly to the previous point, perform a visual inspection of the reluctor condition. This may be difficult in many cases but important. During this inspection, you will need to manually rotate the crankshaft (engine off) in order to visualize the tooths condition. Crankshaft position sensor (CKP) test: if the engine doesn’t start and you have no RPM output, no oscilloscope signal, the wiring is not damaged and you found no metal debris on it, then you must replace the CKP sensor. If the engine starts but hesitates or is rough at idle then you must use the oscilloscope to graph the sensor output and compare the waveform with OEM specifications. Replace if needed. As usual, after any repair clear the DTC memory, repeat KOER driving cycle and check if the code persists. If the code appears again then continue with the next step. Problems with the powertrain control module: the most unlikely cause for this code is a faulty PCM or a corrupted program. Yet, if you are completely certain that all prior tests passed then you must remove the PCM and check it, reprogram it or replace it as necessary. Do you need further help....? Discuss your car trouble code further with thousand's of car experts here Check your car problem in Vehicle Recall Section of your car brandNTB08-088.pdf
 -
 What does this OBD II code mean? This generic OBD2 code is set when the Powertrain Control Module (PCM) senses an inappropriate combustion produced by a lean air/fuel mixture. This particular code is pointing out the bank 1, in other words, the bank of cylinders containing cylinder #1. Why does this OBD II code appear? Under closed loop operation, the PCM adjusts the amount of fuel delivered to the engine with the goal of reaching a perfect combustion and lower emissions to a minimum. Oxygen sensors play a key role during this process providing feedback regarding the O2 content present in the exhaust gases. Based on the information collected from its sensors, the PCM can determine if the engine is running rich or lean and then make the necessary corrections. The OBD2 code P0171 is stored in memory when the PCM detects a lean mixture during a given period of time even after adjusting the volume of fuel delivered. What symptoms may occur with this OBD II code? Expect the typical symptoms from a lean mixture condition: CEL lit. The Check Engine Light will turn on after few driving cycles to alert the driver about the situation. Possible misfires and/or spark knock. Poor fuel economy. You may have rough idling. Hesitation during acceleration, especially under wide open throttle (WOT) conditions. What are the causes that trigger this OBD II code? There're many factors that could cause a lean mixture condition including among others the following: Damaged, burnt, corroded, open or shorted sensor wiring. Worn, corroded, burnt, disconnected or bent wiring harness connector pins. Air leaks in the intake manifold, PCV hose, vacuum hoses, vacuum driven components or MAF sensor tubing. Low fuel system pressure caused by the fuel pump, clogged in-line fuel filter, obstructed or deficient fuel injectors, faulty fuel pressure regulator, or fuel lines leak. Faulty, deficient or dirty mass air flow sensor (MAF) Faulty or deficient upstream oxygen sensor. Faulty or deficient PCV valve Leak between the exhaust manifold and the upstream O2 sensor. Even when unlikely, a defective PCM cannot be discarded. Please notice that possible causes are based on the assumption that only trouble code P0171 is stored in memory. Diagnostic strategy for troubleshooting this OBD II code Warning: If any other code directly related to the MAF sensor is present then you must start diagnosing and solving those codes first. It's highly recommended starting the diagnostic process with the usual information gathering: With the help of a professional OBD2 scan tool, preferably one with OEM capabilities, take note of all data trouble codes in memory, including pending codes. Take note of freeze frame information (if present). Query the vehicle owner about what, when and where the failure occurs. Does it happen with the engine hot? Cold? Under load? All the standard questions. Take note of the vehicle VIN and find a reliable source of technical reference. Once you are done, the next step is discarding an intermittent condition. Using your scan tool clear DTC memory. Perform a complete driving cycle according to OEM procedures. If the code P0171 disappears then inform the owner about the intermittent nature of the code and explain that further testing with the code present will be required. If the code does appear then continue to the testing stage, consisting in discarding the possible causes of the problem. IMPORTANT: the diagnostic procedure explained in this section should be taken as a guideline. Always refer to specific OEM procedures when possible. The workflow for the diagnostic process is: The tests should be executed in sequential order, in other words, complete step 1 before going to step 2 and so on. Repair, fix, or replace any component if you suspect is not in good condition. If any repair, fix, reprogramming or component replacement is made during any step then you should clear DTC memory and repeat the whole KOER driving cycle. If the DTC appear again then you should continue to the next step. If the DTC does not appear again after completing the KOER tests then you can assume the problem is fixed, in that case, continuing with the remaining steps would be optional. The diagnostic process for the code P0171 is as follows: Sensor harness wiring and connector: carry out an exhaustive visual inspection of MAF sensor and oxygen sensor wiring and connectors. Pay special attention to burnt, corroded or deteriorated wiring and/or connector. Unplug each sensor and check for corrosion, damage, bent pins, or loosely connections. Electrical tests: with the help of a digital volt-ohm meter (DVOM) and the adequate wiring diagram perform a KOEO check on the MAF and O2 sensors. Verify supply and/or reference voltage, electrical resistance, continuity, current and ground integrity. Compare the obtained values with the appropriate OEM literature. Vacuum and/or air leaks: perform a manual vacuum reading in the intake manifold test port or in any direct vacuum hose with no direct relation to the fuel injection system. If the vacuum reading is not within the normal value then perform a comprehensive visual inspection of all vacuum hoses including but not limited to PCV hose, fuel pressure regulator hose, MAP hose, brakes hose, etc, also look for intake manifold leaks and pay special attention to possible air or vacuum leaks downstream the MAF sensor. Also, check PCV and replace if defective. Fuel system delivery: carry out a manual fuel pressure reading using a proper fuel pressure gauge and adapters. This is crucial, even if the scanner is reporting the fuel pressure. If the fuel pressure is below its normal value then perform an extensive fuel system test starting with the fuel pump followed by the fuel pressure regulator, inline fuel filter, fuel injectors performance, and fuel lines (leaks) inspection. Exhaust system leak: any leak between the manifold and the upstream oxygen sensor will cause an incorrect reading of the exhaust gases. Inspect the bank #1 exhaust and repair any leak you may find. Mass Air Flow sensor (MAF) maintenance: remove the sensor from the vehicle and perform a visual inspection of it. If you notice oil deposits or clogged conduits then a routine maintenance will be necessary. Using extreme caution clean the MAF sensor internal conduits. Avoid using any aggressive detergent (most commercial engine decarbonizing products can damage the sensor), preferably use biodegradable liquid soap with abundant water and Q-tips type cotton swabs. Let the sensor dry and install it on the vehicle. Repair any possible leak in its housing as necessary. Mass Air Flow sensor (MAF) diagnosis: proceed with a complete MAF sensor diagnostic using your scan tool, DVOM, and/or oscilloscope as required by the OEM literature. Replace MAF sensor depending on results. Once the sensor is discarded as a possible cause for this code continue with the next step. Upstream oxygen sensor: depending on vehicle year and manufacturer you may find installed a traditional oxygen sensor or a modern A/F sensor. They are very similar, however, the diagnostic procedure is not quite the same. Some manufacturers include built-in tests that help in the process, others not. Refer to the proper literature in order to perform a complete sensor diagnostic. Replace if needed. Problems with the powertrain control module: the most unlikely cause for this code is a faulty PCM or a corrupted program. Yet, if you are completely certain that all prior tests passed then you must remove the PCM and check it, reprogram it or replace it as necessary. Do you need further help....? Discuss your car trouble code further with thousand's of car experts here Check your car problem in Vehicle Recall Section of your car brand
 -
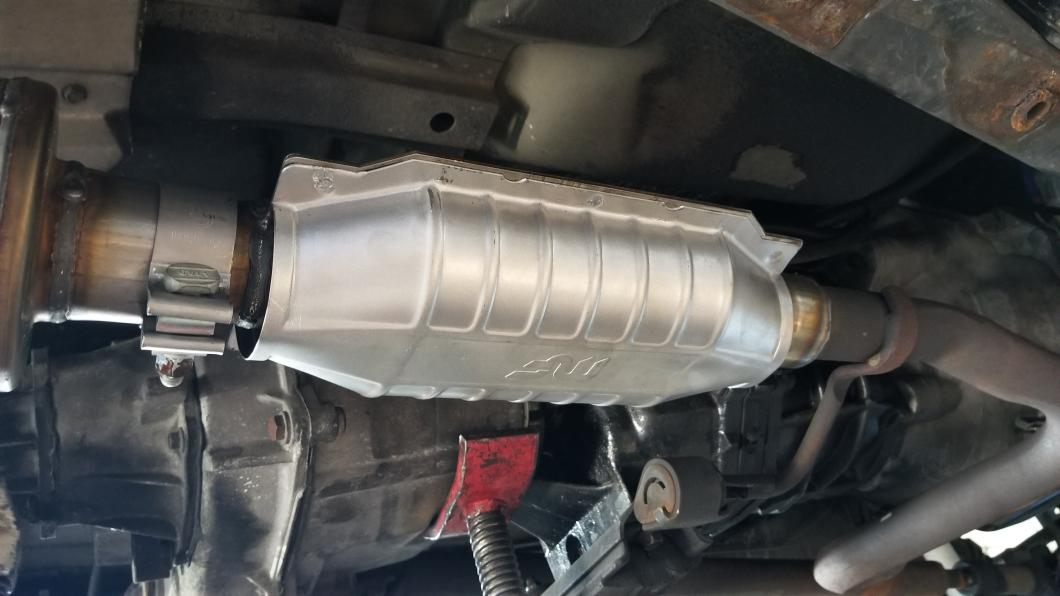 What does this OBD II code mean? This generic OBD2 code is set when the Powertrain Control Module (PCM) suspects of a deficient or faulty component in the catalyst system. This particular code is pointing out the bank 1, in other words, the bank of cylinders containing cylinder #1. Why does this OBD II code appear? The powertrain control module (PCM) calculate the catalyst system efficiency using two sensors: the air-fuel ratio sensor (A/F sensor) located before the catalytic converter and the traditional oxygen sensor located after the catalytic converter. Those sensors are usually designated as the upstream oxygen sensor and the downstream oxygen sensor respectively. It’s not uncommon to find literature referring to them also as wideband oxygen sensor (upstream) and narrowband oxygen sensor (downstream). In order to determine the catalyst efficiency, the PCM first analyzes the upstream sensor data and then compares it with the downstream information. If both sensors are reporting similar results then the PCM assumes that the catalyst system is underperforming. That’s because the expected result is a “cleaner” exhaust reading after the catalytic converter. The OBD2 code P0420 is stored in memory when the PCM detects a low efficiency in the catalyst system. What symptoms may occur with this OBD II code? Usually, the only symptom is the CEL lit. The Check Engine Light will turn on after few driving cycles to alert the driver about the situation. But under some circumstances, the CEL will blink repeatedly. That’s indicative of a serious condition with possible consequences to the engine. Depending on the real root of the problem you may encounter other symptoms related to a clogged catalytic converter: Poor engine performance. Decreased fuel economy Increased engine coolant temperature (if the converter is highly clogged) Unusual exhaust fumes smell (rotten eggs) What are the causes that trigger this OBD II code? There're many factors that could cause a P0420 code including among others the following: Damaged, burnt, corroded, open or shorted O2 sensor wiring. Worn, corroded, burnt, disconnected or bent O2 sensor wiring harness connector pins. Faulty or deficient downstream oxygen sensor Leak between the exhaust pipe and the downstream O2 sensor. Faulty, deficient or clogged catalytic converter. Even when unlikely, a defective PCM cannot be discarded Diagnostic strategy for troubleshooting this OBD II code Warning: If any other code related to the upstream oxygen sensor or engine misfires are present then you must start diagnosing and solving those codes first. It's highly recommended starting the diagnostic process with the usual information gathering: With the help of a professional OBD2 scan tool, preferably one with OEM capabilities, take note of all data trouble codes in memory, including pending codes. Take note of freeze frame information (if present). Query the vehicle owner about what, when and where the failure occurs. Does it happen with the engine hot? Cold? Under load? All the standard questions. Take note of the vehicle VIN and find a reliable source of technical reference. Once you are done, the next step is discarding an intermittent condition. Using your scan tool clear DTC memory. Perform a complete driving cycle according to OEM procedures. If the code P0420 disappears then inform the owner about the intermittent nature of the code and explain that further testing with the code present will be required. If the code does appear then continue to the testing stage, consisting in discarding the possible causes of the problem. IMPORTANT: the diagnostic procedure explained in this section should be taken as a guideline. Always refer to specific OEM procedures when possible. The workflow for the diagnostic process is: The tests should be executed in sequential order, in other words, complete step 1 before going to step 2 and so on. Repair, fix, or replace any component if you suspect is not in good condition. If any repair, fix, reprogramming or component replacement is made during any step then you should clear DTC memory and repeat the whole KOER driving cycle. If the DTC appear again then you should continue to the next step. If the DTC does not appear again after completing the KOER tests then you can assume the problem is fixed, in that case, continuing with the remaining steps would be optional. The diagnostic process for the code P0420 is as follows: Sensor harness wiring and connector: carry out an exhaustive visual inspection of bank 1 downstream oxygen sensor wiring and connectors. Pay special attention to burnt, corroded, open, shorted to ground or deteriorated wiring and/or connector. Unplug the sensor and check for corrosion, damage, bent pins, etc. Electrical tests: with the help of a digital volt-ohm meter (DVOM) and the adequate wiring diagram perform a KOEO check on the downstream O2 sensor. Verify supply and/or reference voltage, electrical resistance, continuity, current and ground integrity. Compare the obtained values with the appropriate OEM literature. Exhaust system leak: any leak between the exhaust pipe and the downstream oxygen sensor could cause an incorrect reading of the exhaust gases. Inspect the bank #1 exhaust and repair any leak you may find. Downstream oxygen sensor: most vehicle manufacturers use traditional oxygen sensors (instead of A/F sensors) for the post-catalyst monitoring. This opens you the possibility of performing the sensor test using a DVOM, an oscilloscope or a scan tool. Refer to the proper OEM literature in order to decide what is the best approach. Replace the O2 sensor if necessary and repeat all KOER tests before continuing. Catalytic converter test: start the engine and let it warm up until it reaches its normal operating temperature. Increase and maintain the engine RPM in the 2000-2500 range and then use a digital automotive pyrometer to take note of the inlet temperature and outlet temperature of the catalytic converter. Under normal conditions, the inlet temperature should be approximately 150°C hotter than outlet temperature. If both temperatures are similar then replace the catalytic converter. Catalytic converter alternative tests: using a pyrometer is arguably the easier way to test the catalytic converter condition but not the only one. With the help of a professional scan tool put on the display the live data of the upstream and downstream O2 sensors. If the downstream oxygen sensor mimics the upstream sensor readings then replace the catalytic converter. Another method to diagnose a clogged catalytic converter is doing a vacuum reading in the intake manifold. If the converter is obstructed will decrease the engine vacuum available. Problems with the powertrain control module: the most unlikely cause for this code is a faulty PCM or a corrupted program. Yet, if you are completely certain that all prior tests passed then you must remove the PCM and check it, reprogram it or replace it as necessary. Do you need further help....? Discuss your car trouble code further with thousand's of car experts here Check your car problem in Vehicle Recall Section of your car brand
 -
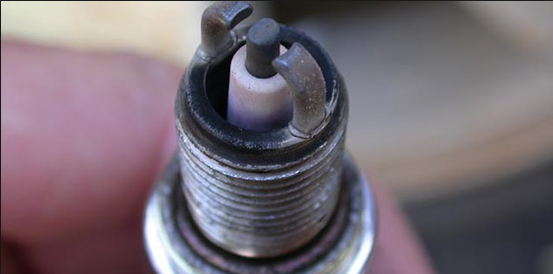 What does this OBD II code mean? This generic OBD2 code is set when the Powertrain Control Module (PCM) detects that misfires are present in the engine but can’t identify the specific cylinder. This may indicate an intermittent problem. Why does this OBD II code appear? The PCM is constantly monitoring engine performance in order to optimize the air/fuel mixture and achieve the most efficient combustion possible. When misfires occur, the PCM tries to isolate the source (identifying cylinder number). But when that’s not possible due to random misfires that jump from one cylinder to another the P0300 code is set. What symptoms may occur with this OBD II code? The following symptoms could be present: Difficulty to start the engine. Random engine misfires. The check engine light may be flashing, The engine may hesitate with varying degrees of intensity. Expect many of the symptoms typically attributed to engine misfires: poor fuel efficiency, lack of power under normal or heavy load, typical smell of gas fumes due to unburned fuel, etc. What are the causes that trigger this OBD II code? This code may be originated by: Deficient or faulty ignition system component: spark plugs, spark plugs wires, coil packs Deficient or faulty fuel system component: fuel injector, fuel pressure regulator, fuel volume regulator, fuel pump Vacuum leak in the intake manifold Leaked air bypassing mass air flow sensor Deficient of faulty emission system component: oxygen sensor, catalytic converter. Deficient or faulty auxiliary emission system component: EGR valve, air injection, EVAP Deficient or faulty crankshaft position sensor Deficient or faulty camshaft position sensor Deficient or faulty mechanical component causing low engine compression: burned exhaust valve, broken valve spring, broken piston ring, leaking head gasket, worn timing belt/chain. Defective PCM Diagnostic strategy for troubleshooting this OBD II code The recommended course of action to pinpoint the source of the problem is two-fold. The first stage is the standard information gathering: Using a professional OBD2 scan tool (preferably one with OEM capabilities) take note of all DTC present in memory including pending codes. Record freeze frame information (if present). Perform a manual fuel pressure reading using a proper fuel pressure gauge and adapters. This is crucial, even if the scanner is reporting the fuel pressure. Perform a manual vacuum reading using a proper gauge in the pressure regulator hose (if applies). Perform a manual vacuum reading in the intake manifold test port or in any direct vacuum hose with no direct relation to the fuel injection system (brakes, air conditioning, etc). Check for air leaks bypassing mass air flow sensor. Repair as necessary. Execute a comprehensive visual inspection with special attention to hoses and lines related to the fuel system. Execute a comprehensive visual inspection with special attention to hoses related to the vacuum system, also pay special attention to possible intake manifold leaks. Perform a test with an exhaust gas analyzer (preferably, a four or five gas analyzer). Perform a manual inspection of exhaust system: using a digital automotive pyrometer take note of exhaust pipe temperature before and after each catalytic converter. Take note of any distinctive smell in the exhaust. Perform an engine compression test and/or a leak down test. Query the vehicle owner about what, when and where the failure occurs. Does it happen with the engine hot? Cold? Under load? All the standard questions. Take note of the vehicle VIN and find a reliable source of technical reference. Finally, clear DTC memory and perform a complete driving cycle to activate KOER diagnostics. If the code P0300 disappears then inform the owner that one possible cause is an intermittent failure and further testing would be required until the code appears again. If the code does appear then continue to the next stage. The second stage is the hypothesis phase. With all information at hand, is time for testing all related components by order of importance. Firstly, if your engine compression is way below its normal values then you must start there. Mechanical deficiencies should be addressed before attempting any other repair. Check spark plugs condition as well as spark plug wires and coil packs. Replace as necessary and repeat all the tests described above. Do the fuel pressure gauge indicate a low-pressure condition? If so, you need to carry out a complete fuel system diagnostic. Start with the fuel pump as the most probable cause. Do the vacuum gauge indicate a possible leak? Then you need to find the leak(s) and repair them right away. Repeat all the tests described above after fixing the leaks. In case you were able to read exhaust pipe temperatures then compare the catalytic converter intake temperature against the outlet pipe temperature. If both temperatures are similar then suspect of a faulty catalytic converter. A normal reading will show a hotter outlet pipe temperature. Replace the catalytic converter if necessary and repeat all the test again. In case you were able to complete a 4-gas exhaust analysis, look for HC and CO values. If the results show high HC, low CO, and high O2 at the same time that is an indication of a lean mixture or EGR problems. If you have high HC, normal CO, and high O2 then you may have a mechanical engine problem. Depending on results, perform a complete EVAP and EGR test and replace components as necessary. Repeat all test when done. If you reached this point and everything is working as expected then you will need running a complete crankshaft/camshaft sensor check. Ideally, this is done using an OEM OBD2 scanner and a good quality automotive oscilloscope. If all the above test pass then you should send the PCM for a complete revision. Replace as necessary. Do you need further help....? Discuss your car trouble code further with thousand's of car experts here Check your car problem in Vehicle Recall Section of your car brand
 -
P000F Fuel System Over Pressure Relief Valve Activated
DamasoSanoja posted a OBD2 code in Fuel and Air Metering Codes
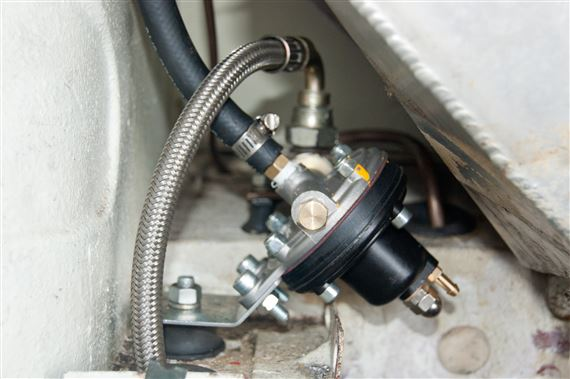 What does this OBD II code mean? This generic OBD-II code is set when the Powertrain Control Module (PCM) senses that fuel pressure is above the desired threshold during several vehicle cycles in KOER condition (Key On Engine Running). Why does this OBD II code appear? During KOER condition the PCM is constantly receiving information from all sensors and actuators. On each computing sequence, these values are compared with the admissible presets. If the fuel pressure sensor indicates a value outside the expected range then the PCM will enter in “Fail Mode” condition and will start its pre-programmed procedures. As part of the emergency routine, the control module will operate the fuel pressure relief valve resulting in an overall decrease in system pressure. Once the PCM ensures that fuel pressure is under control, it will take note of this situation and will wait for the next few driving cycles. If the condition persists, the control module will activate the Check Engine Light (CEL) and store the P000F code in memory. Due to the nature of the problem (fuel system) this code is considered severe and must be addressed as soon as possible. What symptoms may occur with this OBD II code? The following symptoms could be present: CEL lit. The Check Engine Light will turn on after few driving cycles to alert the driver about the situation. The engine doesn’t start. This is the most severe scenario. Occurs when the fuel pressure is so high that even the PCM can’t manage to lower it to an acceptable value. Difficulty to start the engine, especially when is hot. This is considered the second most severe condition and could happen if the amount of fuel exceeds the required for a normal operation. If this symptom is present during “cold starts” then the severity is even higher. Engine misfires. It’s not uncommon to encounter a misfire condition when this code is present. The reason is that the excessive fuel won’t be burned in the combustion chamber and could cause a misfire during the exhaust phase. Expect many of the symptoms usually present when fuel pressure is above its normal values: poor fuel efficiency, lack of power under normal or heavy load, typical smell of gas fumes due to unburned fuel, etc. What are the causes that trigger this OBD II code? This code may be originated by: Bad or defective fuel pressure sensor. The origin of the problem is that the control module is assuming that fuel pressure is outside its normal limits. What happens if the sensor is not reporting an accurate value? Faulty fuel pressure regulator. If this actuator is not working properly the logical result could be one of two: fuel pressure below normal values or fuel pressure above normal values. Flawed fuel volume regulator (if equipped). Here applies the same logic as with the pressure regulator. This component has a direct incidence in the fuel pressure and thus must be taken into account. Deficient fuel pump. Normally, a faulty fuel pump supplies insufficient fuel volume to the system resulting in a low-pressure condition. But some pump models have a built-in relief system that can be flawed. If that case a high-pressure condition may occur. Hugely clogged return fuel filter. This is a rare condition but also possible in fuel systems equipped with a return line filter. If this filter is partially or completely obstructed the overall fuel pressure will increase. Is considered a rare condition because of the filtration properties of this kind of filters. Their mesh is very high and thus is unlikely to clog. Even when unlikely, a defective PCM cannot be discarded Diagnostic strategy for troubleshooting this OBD II code It's highly recommended starting the diagnostic process with the usual information gathering: With the help of a professional OBD2 scan tool, preferably one with OEM capabilities, take note of all data trouble codes in memory, including pending codes. Take note of freeze frame information (if present). Query the vehicle owner about what, when and where the failure occurs. Does it happen with the engine hot? Cold? Under load? All the standard questions. Take note of the vehicle VIN and find a reliable source of technical reference. Once you are done, the next step is discarding an intermittent condition. Using your scan tool clear DTC memory. Perform a complete driving cycle according to OEM procedures. If the code P000F disappears then inform the owner about the intermittent nature of the code and explain that further testing with the code present will be required. If the code does appear then continue to the testing stage, consisting in discarding the possible causes of the problem. IMPORTANT: the diagnostic procedure explained in this section should be taken as a guideline. Always refer to specific OEM procedures when possible. The workflow for the diagnostic process is: The tests should be executed in sequential order, in other words, complete step 1 before going to step 2 and so on. Repair, fix, or replace any component if you suspect is not in good condition. If any repair, fix, reprogramming or component replacement is made during any step then you should clear DTC memory and repeat the whole KOER driving cycle. If the DTC appear again then you should continue to the next step. If the DTC does not appear again after completing the KOER tests then you can assume the problem is fixed, in that case, continuing with the remaining steps would be optional. The diagnostic process for the code P000F is as follows: Sensor harness wiring and connector: carry out an exhaustive visual inspection of fuel pressure sensor wiring and connectors. Pay special attention to burnt, corroded or deteriorated wiring and/or connector. Unplug the sensor and check for corrosion, damage, bent pins, etc. Electrical tests: with the help of a digital volt-ohm meter (DVOM) and the adequate wiring diagram perform a KOEO check on the fuel pressure sensor. Verify supply and/or reference voltage, electrical resistance, continuity, current and ground integrity. Compare the obtained values with the appropriate OEM literature. Fuel system delivery: carry out a manual fuel pressure reading using a proper fuel pressure gauge and adapters. This is crucial, even if the scanner is reporting the fuel pressure. If the fuel pressure is above its normal value then perform an extensible fuel system test starting with the fuel pump followed by the fuel pressure regulator, fuel volume regulator, and fuel injectors performance. Do not discard a restriction in the fuel lines. Fuel pressure relief valve: using a professional scan tool operate the fuel pressure relief valve and verify if it's working as expected. Replace if necessary. Fuel pressure sensor: using a professional scan tool compare the live data readings of the fuel pressure sensor with the fuel pressure gauge. Replace if necessary. Problems with the powertrain control module: the most unlikely cause for this code is a faulty PCM or a corrupted program. Yet, if you are completely certain that all prior tests passed then you must remove the PCM and check it, reprogram it or replace it as necessary. Do you need further help....? Discuss your car trouble code further with thousand's of car experts here Check your car problem in Vehicle Recall Section of your car brand