Leaderboard


Popular Content
Showing content with the highest reputation on 05/21/2024 in all areas
-
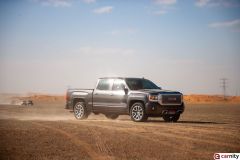
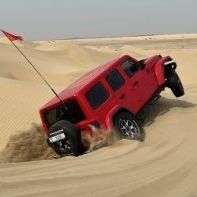
@Aser, @Robk, @Gautam Banka, @Julien Recan, @Mark B, @Marek, @Deepak Eswar, @Luke K P Short Video of the drive. Hope you guys like it1 point
-
@Batuhan Kulac yes this is one of my Fav spots i go here often with all levels we will have a blast for sure1 point
-
Was here last Sunday with loop. Incredible area with almost no tracks. Looong Sideys and great place for fewbies to become confident in crisscrossing and ridge riding. Could we perhaps also plan in heading slightly south east after entry to get a taste of the taller dunes there Davie? Regardless, it will be a great drive. See you all then.1 point
-
@Gauravgood morning. My promotion is not registered in the system yet. Can you help me With it, please?1 point
-
Congratulations @Talal H on your promotion ! Cheers!1 point
-
Congrats and well deserved a new sand conqueror.1 point
-
Calendar not listed but available below https://carnity.com/events/event/2209-morning-fewbie-plus-desert-drive-tawi-nizwa-ridge-ridding-madness-sharjah-25-may-2024/1 point
-
Check engine belt pulleys1 point
-
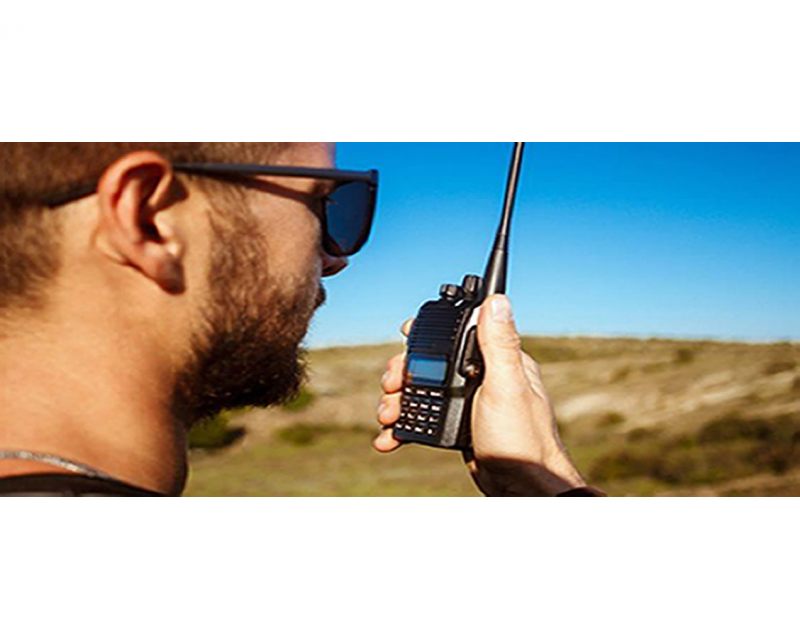 Two Way Radio Guidelines Every Off-roader brings his own radio, programmed to the frequencies described in below advice topic. We will not share spare radios or program your radio on the drive. If you need assistance in programming the radio, post a topic on the Carnity website with your questions and we will help you out. Make sure your radio is fully charged. It will be your only way of communication while driving. Before buying, please carefully read below advice so you are informed properly on which model / cost / shops... No radio = No drive. It is an essential tool and you should make sure you bring it on every drive and learn/practice how to use it. Within Carnity Offroad Club we are using a number of frequencies on the two-way radio. For Desert driving courses we use different frequencies. This is necessary as we sometimes have multiple convoys driving and broadcasting on the same frequency. With this functionality, each convoy can select a channel that they want to use without interfering with others. The 10 radio frequencies are listed below: Below you will find the programming instructions for the most commonly used radios in Carnity Offroad Club. Please get yourself familiarized with your radio, as it's an essential tool for any Offroader, and this device is responsible for establishing clear and life-saving communication while desert driving. After completing the beginner desert driving masterclass, If you are planning on buying a radio, make sure it is the UHF version and not the VHF version. We recommend the Motorola/Crony MT777, Crony CN888, or Baofeng UV-5R because of excellent price / quality ratio, Dragon Mart has many models, just make sure it has the ability to set the frequencies manually. Please do not buy a screenless model like the Baofeng 888S as it cannot be programmed without cable and software. Before getting into the real technicalities, some basic info on radios settings that you will come across: *STEP FREQUENCY: on the FM band, frequencies are spaced from each-other at a certain bandwidth. The Step frequency is basically the incremental change in your radio when you turn the rotary knob on top of your radio. When you program the radio to a certain frequency, you will need to make sure the appropriate step frequency has been set correctly. (see on the above frequency list). * PTT: Short for PUSH-TO-TALK: This is the button on the side of your radio that you push when you want to broadcast a message. * MON: Most radios have a Monitor button. When pushed you are basically monitoring the channel. If no-one is broadcasting you will just hear noise. But this is useful to set your desired volume. * SQL or Squelch: To make sure that your radio does not pickup every little signal, the squelch acts as a gatekeeper to only allow a broadcast on your radio when it is strong enough or nearby enough. If you encounter a lot of noise that's being picked up by the radio, try changing the SQL setting a little bit. A higher setting makes the radio less sensitive to noise. * RX and TX frequencies: RX stands for Receiving frequency, which TX stands for transmitting frequency. in Carnity we transmit and receive on the same channels. * DCS / CT codes: These are basically encryption settings that allow a user to make sure only radios with exact same CT codes can listen in on the chatter. As these settings are confusing and complex, they should not be used (CT should not be showing on your display). Programming the Motorola/Crony MT777: Note: This radio has 2 operating modes called "Frequency" and "Channel". To switch between these modes, keep the ENTER button pressed while switching on the radio. Pressing the VFO/MR button while you're in Frequency mode will bring you to the combined mode, which is basically a screen that shows both the channel and the frequency. You can use either one of these modes during operation. To Program the Channels: 1. Make sure your radio is switched off. 2. Press the Moni (black button on top of the orange one on your left side), and MENU key together while switching on the radio. 3. Wait for the set to display SELF (which means manual setup). 4. Press Enter and it will show the Channel number. 5. You can choose which channel to program by selecting it from the rotary selector knob on the top of your device. 6. Once you have the desired channel, press ENTER. 7. Type your first frequency you want to program. 8. Press ENTER on every setting below to go through the advanced settings and verify if they are programmed as following: (If above settings are not correct they can be changed with the rotary knob on the top keep pressing enter until your set displays the next channel to be set). 03=OFF (if a number is showing here, push the *Lock button until OFF appears). 04= Enter the same frequency as the one you want to program. 05= OFF (if a number is showing here, push the *Lock button until OFF appears). 06= OFF 07= ADD 08= HIGH(H) 09= NARROW 10=-------- 9. Repeat from Step 5 to program the rest of your channels. Very useful Youtube video below: method for adding a single frequency later on, without going through the whole SELF programming mode again: 1. Make sure the radio is in Frequency Mode. Type in the frequency you want to program. E.g 446.00625 2. Press MENU and then press the VFO/MR button. The channel number will start to blink. 3. Use the rotary selector knob to select on which channel you want to save this frequency. 4. Press VFO/MR button again to confirm and exit. Keypad can be locked by pushing the * LOCK button for a few seconds. --------------------------------------------------------------------------------------------------------------------------------------------------- Programming the Crony CN888: Note: This radio has 3 operating modes called "Frequency", "VFO", and "Channel". You can toggle between these modes by pressing the orange Function button on the top left corner, followed by pressing 1 (Mode). Programming the radio as described below can only be done in VFO mode. 1. Switch on the radio. 2. Press the Function Key (orange button on top left corner). 3. Press 4 (STEP) until it shows 6.25. Press EXIT to confirm. 4. Now type the first frequency you want to program. Eg. 446.00625 5. Now press the # button. The Channel number in the corner of the display will start to blink. 6. Select with the A (up) or B(down) buttons to choose wich channel you want to save the frequency. 7. Press the C button. the radio will confirm by saying "SAVED AS RX FREQUENCY" 8. Press the # button again. The Channel number in the corner of the display will start to blink. 9. Press the D button. the radio will confirm by saying "SAVED AS TX FREQUENCY" Keypad can be locked by pushing the Function button, followed by the *F.L button. Programming the Baofeng UV5-R: When buying a radio like the Baofeng UV5R, many certain frequencies and channels are already programmed into the radio, but these are different from the ones we use in Carnity. As you will be programming 5 new channels onto Channel number 1 till 5, it is important to first delete these existing frequencies stored in those channels. You can do that as following: Step 1: Delete the existing channels from channel 1 till 5: 1- Switch on the radio 2- Press the MENU button followed by the buttons 2 and 8. (Menu 28). 3- Press MENU, and then use the UP/DOWN arrows to select which channel you want to clear. 4- Select CH1 and press MENU again, you will hear "delete channel, followed by confirmed". 5- Now go back to step 3 and do the same for the following channels (CH2-CH3-CH4-CH5). 6- Now all 5 channels are clear and ready to be programmed. Step 2: Set the step-frequency: - Switch on the radio - Press the MENU button and with the up and down buttons select STEP frequency. - Change this to 6.25 and press MENU to confirm. - Press EXIT to go back to the main menu. Step 3 Program the new frequencies in the radio: 1- Press the VFO button. You will hear the confirmation “frequency mode”. 2- Make sure the arrow is on the top line. If not, press the blue A/B button. 3- Type in the frequency you want to save. I.e 446.00625 4- Press MENU, followed by button 2 and 7 (menu 27). You will see MEM-CH. 5- Press MENU and now use the up and down buttons to select the channel you want to save it on. 6- Press MENU again to confirm. Your first frequency is now stored under channel 01. (receiving memory). 7- Press MENU TWICE again to confirm. Your first frequency is now stored under channel 01. (transmitting memory). 8- Press EXIT and repeat from step 3 onwards to program your remaining channels. Note: To program the Carnity backup frequency channel 5, you will need to set the step frequency to 12.5. When done, follow the same steps to program and save it under channel 05. You can either program these channels one by one into your radio, which is the easiest for you later on, or you can just enter the frequency without saving it. Some extra notes: Option 5 in your menu should be on Narrowband. Option 10 and 12 in your menu should be set to OFF (we are not using CT codes). BaoFeng_UV-5R_Manual_(1).pdf You can also learn all possible desert self-recovery techniques in one comprehensive 1-on-1 course. Perfect for beginner to advance level off-roader to be fully ready with the right skills, knowledge and techniques while off-roading. Or you can unleash the full potential of your 4X4 vehicle and experience the thrill of conquering the dunes with our Advance Desert Driving Course.1 point
 -
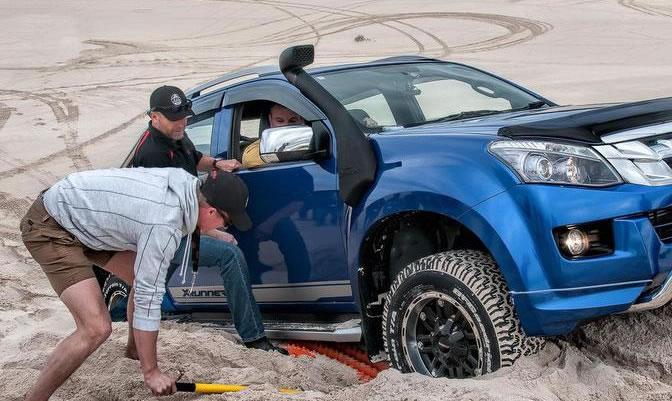
This tutorial will describe the safest techniques to recover a vehicle from the desert. We will try to cover all scenarios and focus on the safety aspect. Although many offroaders have already learned the art of off-roading in the UAE desert, performing recoveries is a skill in itself and needs practice and clear understanding and respect of the dangers involved for the person recovering, the person being recovered, and bystanders. This is a skill that will require practice, and the more recoveries you do from different situations, the more experienced you will become. Whenever you have ANY doubt in during a recovery, you should assess the situation with other senior members and make the decision together. 2-3 people will most likely have a better total overview and will result in a safer recovery attempt. Team work is essential in this sport and all the more during recoveries. 4x4 Recovery Tools D-Shackle or Bow Shackle The D-shackle, also called a bow shackle, is the tool that you will use to connect your recovery rope to the tow-hook of the vehicle (both sides). Since the uprising of soft shackles, and the incidents that happened with poor quality D-shackles, most Off-roaders have now shifted to using soft shackles. A good quality, rated D-shackle can still be useful in some scenarios, and they are safe if the recovery is being done properly, but the risk of this projectile flying through the windshield and potentially killing people has made this shackle a tool only to be used by people who have 100% skill level and know what they are doing. Soft Shackles Soft shackles were first used in the marine/sailing world and have recently become very popular as the perfect shackle to use for off-road recoveries. They are easy to use, and in case they break they will not become a deadly projectile. They are more expensive than metal D-shackles but will last quite long and there is no compromise when it comes to safety. The shackle is made of UHMWPE, also known as Ultra High Molecular Weight Polyethylene, or Dyneema. This synthetic yarn is 10 times stronger than steel. Kinetic Recovery rope or Snatch Strap. A kinetic recovery rope is made of Nylon. The most useful characteristics of this rope is that it stretches about +/- 20% during a pull. This means the “tug” or “jerk” effect of the recovery will be dampened, resulting in less strain on the vehicle’s tow-points. The downside is that because of this characteristic, people sometimes have the tendency to start pulling much harder, which can result in breaking the vehicle’s tow-points or chassis. The recoil effect of this rope creates a massive force and that is why during a recovery we clearly instruct to not exceed 15km/h during recoveries, and to gradually build up the strength of the pull in 2-3 attempts. Do not use this rope for towing a vehicle. Due to the stretch effect it will be difficult to control the towing process, and furthermore you will damage the rope as it needs to recoil and settle after a recovery. When choosing a kinetic recovery rope, you should select a rope that has a breaking strength of 2-3 times the weight of the vehicle you will recover. For example; if you recover a Nissan Xterra which weighs 2 ton, the breaking strength of the rope should be at least 6 tons. Most recovery ropes have 10-15 Tons breaking strength. The reason for this is that the forces involved when a vehicle is completely stuck in the sand are far higher. Our club uses both the Viking Kinetic rope as well as the AOR Kinetic recovery rope with excellent results. The Viking rope costs about 350AED with a bag and 2 soft shackles included, while the AOR kinetic rope costs about 370AED without soft shackles. (AOR soft shackle cost 155 AED per piece). This rope is not the same as a Polyester Webbing sling that you will find in most hardware shops ! Kinetic recovery ropes will cost you about 350-400 AED. A Polyester webbing sling is far cheaper but does not stretch. Performing a Recovery When doing a recovery there will be tasks involved for both the person doing the recovery, and the person being recovered. It is essential that there is a clear communication established over the radio or verbally to make sure the recovery is being done professionally and safely. Bystanders should remain at a distance radius of at least 10m during the recovery process ! Scenario 1: A vehicle is crested Getting crested is an event that happens regularly during off-roading, and by following below steps you can recover a vehicle safely. The individual tasks for each person are mentioned below: # PERSON PERFORMING THE RECOVERY PERSON BEING RECOVERED 1 Will first inspect if the vehicle is front-heavy, back-heavy, and if the car can be maybe recovered without ropes. In many cases it is sufficient to clear the sand from the wheels, from underneath the body of the car, and try the self-recovery method and engage diff-locks. can help with clearing the sand from the wheels 2 When recovery with a rope is deemed necessary, he will attach the rope to a secure “recovery point” of the car. The recovery point needs to be strong enough and in perfect condition. He will not perform recoveries on worn out or heavily rusted towpoints. You need to keep approximately 2m free-play in the rope, so you have space to ramp up the vehicle before the pull starts. 3 Will step inside his car, put on his seatbelts, engage 4LO and put his car in First Gear forward or Reverse depending on the direction he will be recovered. He then announces on the radio that he is belted up, car is running in low gear, and he is ready for the recovery attempt. 4 Get inside his vehicle, engages 4LO, puts on the seatbelt, and asks the person being recovered if he is ready for the recovery attempt. Acknowledges the message and confirms he is ready for the pull. 5 Will drive a little bit forwards and backwards to create a firm track if needed, then starts off with a gentle pull. This is to test the waters and in some cases the vehicle will already come out. 6 If second attempt is needed, he will announce on the radio that he will try again. Acknowledges the message and confirms he is ready for the second pull. 7 Performs second attempt which is slightly more aggressive 8 The car comes out and is bring brought to flat ground where the rope can be safely removed. Follows the recovery vehicle to flat ground Scenario 2: a vehicle is bogged down When a vehicle is bogged down or in a ditch, and needs recovery with a rope, the same scenario as scenario #1 will be applied. You should always clear the wheels and shovel as much as you can to ease the recovery. It is also very important to properly position the vehicle to avoid sharp angles. Again, the rope should have at least 2m free play before starting the recovery. Make sure you position your rope in a zig-zag shape and verify it is not in a knot. Creating a knot in a kinetic rope will damage it beyond repair ! Scenario 3: a vehicle needs to be pulled upwards In the case that a vehicle needs to be pulled upwards, you need to be aware that the force that you will need to apply will be far higher. Some examples: - Towing a 2 Ton vehicle on the road results in a 100kg pull resistance. - Recovering a wheel-bogged down 2 Ton vehicle on flat sand results in 2000kg of pull resistance. - Pulling a chassid-bogged down 2 Ton vehicle on an upward slope of 15° results in 3500kg of pull resistance. (as photo below). This is the main reason why it is so important to clear the wheels from sand and shovel out the body of the vehicle as much as possible to reduce the resistance. Be aware that when pulling a vehicle upwards on a steep angle might damage the front bumper on the vehicle that is being recovered. Especially on slopes of 10° and more, the rope can hit the front bumper. Additional safety measures Safety Strap At a more advanced level of off-roading, safety strap is a very helpful tool to secure the rope or d-shackle during extreme recoveries. In that case it will avoid from becoming a projectile. Tow Point Essentials Most 4x4 vehicles are equipped with proper tow hooks which are welded to the chassis. In more modern SUV's which are less meant for heavy duty use, you will sometimes find a screw-in type of tow hook. These are generally ok for occasional use but for weekly recoveries they will not do as the threading will wear out and eventually they will fly out. Every Offroader should make sure he has proper recovery points on the front and back and that they are in perfect condition. During more extreme recoveries there are additional techniques we apply to distribute the load, such as a bridle rope. This rope basically distributes the load between both towpoints. In which direction should i put my vehicle when i recover someone ? This will depend on a case to case basis: When during the recovery you want to have FULL visual of the car that you are recovering, it will make more sense to attach your rope to your front recovery towpoints. In the case the recovery needs a bit more force, and you have a towbar or stronger recovery points at the back, then it makes more sense to attach your rope to the rear towpoints or tow bar. In the case that you really want to see where your own car is going (in difficult terrain with bushes for example), it will also make sense to perform the recovery by attaching the rope to the back of the car. Can i attach my shackle or rope to a tow ball receiver ? Tow balls are NEVER to be used for recovery purposes. There have been many incidents where the tow ball has come off and became a deadly projectile. DO NOT ever recover a vehicle by connecting to the tow ball !!!1 point
-
 Welcome to a basic guide to off-road venturing. Most of us would like to venture into the vast dunes we see on either side of the road, but it can be tricky for the uninitiated to take the first step off the tarmac and into the unknown, Well the first thing to remember is sand is almost like a liquid surface and our main aim is to stay above it, buoyant if you will and not sink. How do we do that? Lowering the tire pressure. How does that help exactly? It increases the contact patch or footprint of your tires. Which basically means now there is more ground to support the weight of your vehicle and you wont sink in as easily. For basic desert driving at first stick with 15 - 18 psi, going any lower exponentially increases the chances of the bead of your tire losing its seal with the wheel and letting go of all the air (pop out), usually at the worst time and place possible. Once you understand and gain more experience in the art of desert driving you can go lower according to the vehicle and terrain at hand. But in the beginning lets stick to 15 - 18 psi to keep our first steps in to the desert as trouble free as possible. Now that you have your tires ready for the terrain what do you do now. Full throttle starts are mostly never a good idea but rather gentle acceleration, some situations you need to give it more go than normal, but if starting from a flat and relatively smooth area it is always better to be gentle. Hard starts will usually end up in digging yourself in if not careful. But don't be a granny about it either, remember this is not your typical tarmac surface and gentle blips on the throttle will not get you anywhere. You have to learn to achieve that balance. Once you get going you have to remember what was mentioned earlier, that think of sand as a liquid surface. You have to keep your momentum, in fact momentum is your biggest friend out in the desert and once you have an intimate relationship with momentum, it will help you out in a lot of places. What you initially thought were impassible tracts of sand, momentum will take you through them. Think of this as water skiing, once the boat slows downs the skier tends to start going lower and lower into the water until he finally sinks. Although the desert will not consume you and your car like a body of water but getting back to that speed and motion is going to be real hard, and in some places its just not possible to build that momentum again and you will either get bogged down or have to change route. Don't be afraid to let your engines stretch its legs to keep the momentum going, thats how you learn advance desert driving skills. Most people are afraid to rev their engines too much simply because they are not used to it. Don't change up gears too soon, as the lower rpms will rob the wheels of the required torque to keep the momentum going. But also just don't stick in one gear and let it scream in pain. If you're driving an automatic keep the pedal planted in just enough that it does not shift into the next gear or mashed totally into the carpet that it downshifts and starts to over rev. Automatics in this regards can be a slightly tricky, but they shift gears in milliseconds and keep the downtime in between gears to a minimum. While on a manual you have to be quick and crafty with you changes as too long between gears and you could have broken that fine balance keeping you afloat. Again taking similarities between water and sand, more like ice in this example. Steering. it will not be as sharp or as responsive as on a hardened surface. The vehicle will not turn on a dime. There is a small delay in where you want the nose to point and where the car itself wants to go. Basically you turn and then you wait for the rest of the car to catch up before it actually starts to and this delay gets worse as the speed of your vehicle increases as well as the softness of sand your driving on. So you have to be a little ahead of time, a sort of a mini time traveler if you wish and be able to predict where you want to be going in the next few seconds rather than waiting for the last moment. Sometimes no matter of future predicting ability can help you when gravity becomes in charge, this usually happens on slopes and we will talk about this later. Now that you got your self going, what about stopping? And as always braking, this is different here too, you just can't slam on the breaks. Because all this does is digs your tires into the sand and then trying to move again becomes a hassle if not totally getting stuck. Always gently ease off the throttle and apply the breaks slowly and when ever possible let the car come to a halt on its own. Also makes a big difference where you choose to stop. If your facing uphill and the angle is high enough. 9 out of 10 times you will not be able to carry on forward any further. Always try stopping facing downhill even if it a a very gentle slope. You'd be surprised how well gravity works ! OK, now that we know how to drive on flat surfaces, lets tackle some fun stuff ! Going up a dune ! Sand dunes have two sides to them. One is a gradual climb leading up to what I refer to as the slip face. The other side, a real sharp drop and most of the times there is a nasty bit in the middle of these too. Which I like to call the blade but usually know as the ridge. At first always try to go up the easy side first. Always look for a smooth and straight line up. Which is clear of all bushes, dips and bumps, basically as smooth a ride up as possible. Then comes the tricky bit. Now what you need is power but in very measured quantity. Too less and you won't make it and too much will send you flying off into the unknown on to the other side. So to make it simple, the thing to do is give it as much as you got at first but easing it off or totally letting it go before you go flying off. Three Fourth way up the climb you should be able to guess from the forward momentum of the car that whether you need to keep the pedal mashed into the carpet or you need to back off or totally let go and let your old friend momentum take care of the rest with just some gentle blips from you here or there. Keeping in mind the amount of run up you have had before the climb. If you had enough speed before you hit the dune and specially of it is not a very big one, say twice the height of your car. It would be unwise to mash it as you already had loads of speed and your own inertia will take you over just keep the throttle steady or give it a little more if you feel your losing forward motion on the way up. Sometimes you might even need to slow down if you don't want your bumpers from smashing into the wall of sand. What do you do once your on the top? Well hopefully your not on your own and you are following someone or driving with an off-road club so keep an eye on that car what it does, goes over, turns to one side etc etc and try to replicate the same thing. If your following someone give it sometime before you attempt the climb yourself, in case there is a problem you cannot see. If there is you should see someone come over the top to tell you or if you have a radio you should get an all clear. If your by yourself. Always a good idea to go on foot and see whats on the other side. If you don't make it the first time round. Put your car in reverse and slowly come straight down. Sometimes this can be tricky as you may be a bit disorientated from the angle or which way the tires are pointing. Remember gravity and the delayed steering. Gravity will initially pull you down straight and then the delayed steering will come into play and you could end up sideways on a slope. Also never freewheel down, always keep in gear and let engine braking help you down plus this also helps you keep in control of the situation. Then back up a little further if possible and give it more throttle the next time. Also keep in mind that sand is also a little bit like pie. A hard-ish crust on top with being softer on the inside, and once you drive over a patch you have effectively cracked the crust exposing the softer inner side. So try not to follow your tracks of the previous attempt as you will be treading on the softer exposed sand. The more cars that pass the more churned up and softer it gets. Sometimes it is not possible to get a fresh patch of sand. Only one small exit out of a pocket or only a small crossing on top that is not sharp enough to cross over. In that case try to be on as much undisturbed sand before you are forced to get in line. As with all things, what goes up must come down. Going down is one of the easier parts of desert driving and sometimes the most scarier parts specially if your a beginner, but don't get too easy about it either. Things can still go wrong. First basic rule is too keep you wheels and the nose of your vehicle pointing straight down. This might be harder than it sounds, remember what was mentioned earlier about reversing down a dune, the same thing can happen while going down nose first. Again never freewheel in neutral down a drop and don't brake too aggressively this will cause your nose to dig in and in a worst case scenario cause you flip over, head over heels. Although this is very rare but this might happen. Another phenomena while slithering down a dune is fish tailing. That is when the end of your car wants to over take the front, So it starts to come up sideways from behind. What needs to be done is to make the appropriate steering correction and slightly accelerate for your front to get back up to speed with the back. But gently, over enthusiasm here can end up worse than the initial symptom of fish tailing. If coming down a sharp and steep downward slope engage low 4, 1st gear or D 1 if an auto and then let the car comedown with the help of gravity and engine braking. Better is to start off with less sharper gradients and practice this with being in D 1 or 1st. Once you get used to it you should be able to complete this task in D and just the brakes. But it is always handy to know this technique, In the end driving in the desert is a delicate balance between momentum, gravity and power and only practicing and driving as often as possible can get you better at it and develop a sixth sense about it. You will learn to interpret the feedback of your vehicle and steering wheel is giving you. You will learn to read the terrain better, even before your vehicle gives up on you, you will realize your not going to make the climb and its better to stop or if you have enough momentum left to come back down. But its better to start of with the correct basics instead of getting ingrained with the incorrect technique right from the start. This is just a very basic guide covering only some of the points. Remember nothing beats real world practice. Hope this has been of some help in making that transition from tarmac to sand. Feel free to add or edit or even post questions. I will try my level best with whatever knowledge I have to try to answer your queries.1 point
 -
 Top 3 off-road mistakes that driver makes in the UAE People assume driving off-road is a lot easier due to no rules and restrictions as compared to driving on the road. That may be true to a certain extent, but after a while it might get messy if certain rules aren’t followed. Off-road freedom is awesome, but you should always remember these three MAJOR off-road mistakes that every experienced and in-experienced off-road drivers come across in the UAE. By the way, all these 3 rules apply for desert, mountain, small drive - overnight drive, beach sand & sand dunes. So by remembering these 3 golden rules you will save yourself from 75% of the off-road threat that may spoil your enjoyment or cost you some expensive repairs. It's always good to read little bit more on how to drive off-road before you embark with your most capable 4x4 vehicle. If you are new to off-road then you should listen to people advice, see what others are doing and learn how to negotiate with various off-road obstacles. Deflate, deflate and deflate: No car in the world is capable of driving off-road without deflating. You might get away with few 100 meters without deflating, but eventually you will get stuck. Yes you need to deflate in sand and on rocks as well. For sand, ideal is to deflate to 15-18 PSI as per terrain difficulty and also as per the temperature (deflate more in summer, when sand is loose). Maximum you can deflate to 12 PSI (not lower) if you are in very challenging terrain like Liwa, Sweihan or Al Wagan sand dunes. For wadi's and rock crawling you need to deflate lesser up to 22-25 PSI as compare to sand. In wadi and rocks little deflation help in better traction by increasing the footprints while crawling and absorb LOT of shocks on loose gravel or rocky terrain, while driving. Plan your stop: About 90% of off-road stuck happen due to stopping in wrong places. Always choose the safe spot to stop, and stop slowly. People driving in sand dunes while climbing up and down the dune, get tempted to stop in amazing scenic spot, but when they start again they get stuck. Don't stop on uphill, sideways and on loose sand which will make it difficult for you to move the vehicle again. When in motion, use that momentum to choose the flat, hard spot (as much as possible) so that moving again is easy. Stopping hard with harsh brake will dig you in the sand and moving again will be even more difficult. In the inevitable situation if you brake hard, then go backwards few meter and gain momentum to drive further. As you advance more in desert driving in sand you will see it is very simple physics that needs common sense more than an ego of being an owner of "most powerful car" and "most expensive car". Take it easy and be ready to go back little bit and start again if you are stuck in a difficult spot, try to find work-around than forcing your way in because mother nature is sometimes more stubborn than you are. For rock climbing, crawling and wadi passage plan your stop carefully so that you can start back safely and avoid any excessive wheel-spin or slippage of your vehicle. In rocks while negotiating with big boulder (stones) you need more of patience and external help than too much gas and distractions. External help means to have your friend or family person outside the car who can guide your exact tire movement (very slowly) and help you step on safe spot and pass through. Don't panic when you are stuck: The beauty of off-road driving is EVERYONE will get stuck, whether you are a super sales achiever, manager, leader, CEO or the VP. The idea is to stay calm and "DO NOT PANIC". Majority of off-road stuck are very minor and you can recover yourself in less than a minute if you are calm. If you panic and give too much acceleration it will dig you deep in sand and might dislocate your vehicle more in rocks. When vehicle is not moving, first attempt is to try reversing immediately and seeing what is blocking so that you can avoid it. If reverse is not possible, then step out and identify the situation, have few sips of water and you will get creative in thinking different ideas to get out. If you are stuck in wadi's and mountains, you can probably move few smaller rocks aside by hand and make your way or sometime you can place smaller rocks under your tire and use them as a stepping stone. In sand stuck, if vehicle is not moving engage your Lo-Gear (4WD lo-gear) and start with little aggressive acceleration up to 2500 RPM (ONLY) and that too in quick short intervals (no full gas for long stretch). See if it helps moving your vehicle few meters or even centimeters, then repeat the same in front and reverse several times and make little movable path and when you have a good stretch, then take off with more acceleration up to 5000 RPM (sometimes even full gas). Idea here is to avoid full gas in beginning as that will dig you down and once you have little movable path and vehicle is in motion for 5-10 meters and you give more or full acceleration, it will help you cross that climb, loose-sand or uneven spot more easily. If everything fails as per self-recovery, call for help and don't dig yourself deeper by too much excessive self-recovery, as that will make the situation worse for other car to pull you out.1 point


This leaderboard is set to Dubai/GMT+04:00